Friday, 24 January 2014

Beauty Tip of the Day - Manicure Week - The 5 min manicure!

We're all in a rush most of the time, whether its work or family commitments we rarely have time to sit and pamper ourselves. A couple of years ago, painting my nails would be a daily occurrence, I would sit for ages at the weekends painting intricate designs on each nail, adding glitter and stones, a real work of art. I would paint them but not really give myself a proper manicure or allowing them anytime to breath or heal in between. Doing that, mixed with general life left my nails breaking, peeling, and my cuticles were a mess, just generally looking horrible.

I went for an emergency appointment to my friends salon and had a manicure with an OPI gel top coat. They looked so much better and now the length is getting just where I want it to be.

If you don't have the time or the money however I've done a quick DIY manicure that should take no longer than 5 minutes!!

What you'll need....

1. A nail file, I like a glass file rather than an emery board as I think its less harsh, but use what you've got.

2 . A cuticle pusher, you can use an orange wood stick if you prefer but I think this is quicker.
 
3. A good base coat - for what ever you need, a strengthener, a ridge filler, a growth stimulator.
 
4. Cuticle Oil - can be found at a boots or superdrug - don't miss this step!!


If you've got slightly more time and you want to add colour you will need...
 
5. A colour polish
 
6. A top coat - I like a chip resistant
 
7. Quick drying spray - again available at superdrug or boots.


Ready....Go!
 
1. File all nails, making sure you only sweep the file in one direction to get the desired shape
 
2. Use cuticle pusher to push back all cuticles removing any excess from the nail bed, leaving nail bed clean
 
3. Apply a very thin layer of base coat, this will dry very quickly if you have applied a thin layer.
 
4. Apply a drop of cuticle oil to the cuticle of each nail and rub into whole nail, this will leave your nails looking nourished and perfect!
 
If you have a little more time....
 
After step 3 applying your basecoat...
 
4. Apply two coats (if needed) of your chosen polish
 
5. Apply a thin layer of top coat
 
6. Spray all nails with quick drying spray
 
7. Finally apply a drop of cuticle oil!
 
And your done!!
 
If you keep practicing this technique your nails will look healthy and perfectly polished in no time at all!!
 
Hope you find this helpful, if you have any favourite products of any of the above let me know.
 
Hannah x

Tuesday, 21 January 2014

Beauty Tip of the Day - Manicure Week - How to remove Glitter Varnish

This week on my blog is Manicure Week! I've had a few questions on how to's for nails so this week is dedicated to that!!

Thought I'd start with a subject close to my heart - Glitter Nail Varnish!!!! I LOVE glitter polishes, my favourite brand for their glitter range and great prices is Barry M. Here are some of my favourites...


Gorgeous!!!!!! Doesn't glitter just make everything better!!! I think a glitter nail can compliment most outfits and look great on a night out! 

Only problem is....taking it off!! Before I discovered this method, I would dread the moment where I had to remove the glitter. I don't know about you but I would sit there with my cotton wool and a whole bottle of remover to be sat there 30 minutes later, used cotton balls all over the floor, no remover left, varnish stained fingers, and not much paint on the nail but the glitter would still be holding on!!

No more my friends!! No more!!

All you need is -

1 x bottle of any nail varnish remover
10 x small strips of kitchen foil
5 x cotton wool pads cut in half to give you 10 halves


Step one - soak the cotton wool half in remover and place over your nail.


Step two - wrap that with a piece of kitchen foil.


Step 3 - After 5 mins or so, squeeze the foil and pull off your finger! You will find all the varnish has been removed and your ready to apply a base coat for your next colour.....probably another glitter now you know how easy it is to remove!! ;-)

Hope this helped my fellow glitter fans!!

Also worth a mention is Barry M's newest collections!!

A new matte finish foundation in 5 shades for only £5.99
And three new eye and cheek palettes £6.49 each
I'm really looking forward to trying these, they've been out for a few weeks but I haven't seen them in stores near me yet. Time to shop!!

If you've tried any of the new products please let me know what you think!

Hannah x


.

Sunday, 19 January 2014

Men's Tip Monday - Manicure Week

This week on my blog is all about taking care of your nails, so time to put the MAN in manicure! I'm not saying you need to go as far as a polish, that's a bit excessive but a manicure, even a 5 minute DIY job is better than nothing.

Why? Because nice, clean, short, tidy nails say a lot about a man and his hygiene standards. A man with long dirty nails is not a man that you want holding your hand or cooking you dinner, trust me guys, if I'm thinking it, other girls are thinking it too.

I only have two rules for you really,

1. Keep em' clean
2. Keep em' short

So what if you don't want to go to a salon because your too embarrassed? I've got a few essentials that every man should have to be able to do a quick DIY manicure at home.

A nail brush - great for cleaning your nails, especially if you have a job where your hands are always filthy! Available in most supermarkets or drugstores like boots.


Second thing - Nail Clippers . Unless you have used scissors for years on your nails and your happy with them, get clippers, great for keeping them short, styled and it's super quick and easy to use. Again you can pick these up at supermarkets or drugstores.


Last but not essential (this maybe a step too far for some so just keep scrolling if it is!) 
A Nail File. If you have used the clippers and cut your nails short, you may find you hacked away without much regard to the shape your leaving behind leaving them uneven and catching on your clothes. Keeping a nail file handy when you've trimmed you nails just finishes them off. Lightly file in one direction two or three times to leave the free edge of the nail smooth.


And in no time at all you will be done!! See, it wasn't that painful was it!!

Hannah x


Thursday, 16 January 2014

Beauty Tip of the Day - Award Season - Don't be afraid of a pop of Colour!

I loved Kaley Cuoco's make up for the Golden Globes!! It's so different and refreshing to see a smokey eye with a pop of colour rather than the normal smokey blacks, grey, browns, nudes etc. Kaley's make up artist decided to go for a Emerald Green smokey eye to bring out the colour in her amazing gown.


I was really surprised to hear she used Avons Glimmerstick £6.00 Emerald (picture below in blue) to add the pop of colour to the eye, along with other products, but it shows how affordable celebrity looks can be. 

What's good about this product is that is so versatile, you could use it for the whole eye, or if you not feeling to confident with a full colour eye, you could use the Glimmerstick to add a colourful liner, either on the lid or under the eye.


I actually decided to go for a pop of blue last night to try out the new Soap & Glory liners I got. I was really pleased with them, really easy to apply and it lasted all night without irritating the eye!!

If you decide to go for a full smokey eye like Kaley and your not sure what colours will work use something like an eyeshadow quad like Loreal Colour Riche, it does all the colour selection for you for the perfect smokey eye. They are highly pigmented and you can buy from boots for £7.99 in a full range of colours, blues, pinks, greens. I'll be doing a beauty post soon on how to choose the best colours to bring out your eye colour.

Color Riche Quads E8 Bleu Marinière

Do you like to add some colour to your eyes?

Hannah x


Beauty Tip of the Day - Award Season - Jessica Chastain's Lovely Lashes

I LOVE Jessica Chastain's look here, her make up is so simple so natural looking, but at the same time she looked glowing, vibrant and absolutely gorgeous!!!  

Two things I loved about this make up in particular is her highlighter which looks beautiful, and her LASHES!!!! Her lashes for me make this look! I love fake eyelashes to add a touch of glamour to your make up, I used to only wear lashes for events or nights out but I've started to appreciate them a lot more for just day to day as well. 

I don't wear the same kind of lashes for day and night, I go for thickening or lengthening natural lashes for the day, but for nights out I would go for the same kind of look Jessica has gone with here.


The brand I love for all my lashes is Eylure. You can get them from boots for around £5.00 + and they all come with their own lash glue.

Here are a couple of lashes that I would recommend for a fuller lash look like Jessica's. 

These here, are strip lashes. They are more natural looking, so if you don't like anything to much, these will be perfect for adding more length to your lashes without looking to heavy. 

These next pair are for more experienced lash wearers, they might be a bit heavy if you've never tried lashes before. The reason I've chosen these two pairs of lashes are because as you've probably noticed the lashes are longer in the outer part of the eye than the inner, giving a cat eye look, I think they are the most flattering kind of lashes.


The other option you can get is individual lashes, you can do these yourself or get a salon to do it for you. Using individual lashes can allow you to taylor the lashes how you want them, thickening, lengthening them, adding more as you go.


I personally prefer strip lashes, I think they're easier to apply and easier to remove. Also if you look after your strip lashes by carefully removing them and storing them properly you can use them again and again.

I will be doing a tutorial soon on how to apply lashes for those who need some help. 

Do you wear lashes? Leave a comment if you have a favourite brand.

Hannah x


Wednesday, 15 January 2014

Beauty Tip of the Day - Award Season - Keep Young Skin Young!


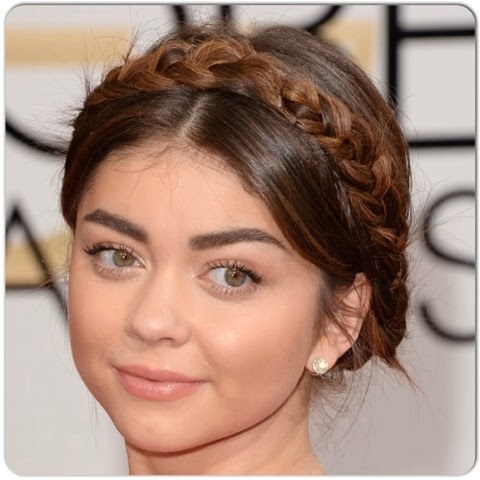
Today we're going to look at slightly younger celebrity looks. They both looked so beautiful and fresh faced, that suited their age perfectly! Rather than masking their beauty, the make up enhanced their naturally gorgeous glowing youthful skin. So I thought I would show you some ways you could do the same! I'm going to focus on foundation, cheeks and lips because I think when your in a rush for school, you want to be able to do it quick!

Sarah Hyland - 23


Taissa Farmiga - 19


Foundation

You may have gorgeous skin that doesn't need any foundation, but majority whether needed or not wear it anyway. With young skin though, you really want to stay fresh faced, a mistake a lot of girls make is thinking that caking the make up and foundation on makes them look older - which is does - but it may not be all that flattering.

I've recently tried out Loreal's Nude Magique Eau de Teint (£9.99) which I think will compliment younger skin perfectly, it's a light coverage allowing your natural glow to still come through, but it's enough to make you feel that you have foundation on. It says it's a fresh feel foundation, weightless, and it is, I can't feel that I have it on but my face is so soft and silky I love it! 


It is a very very thin consistency though!!!!! So don't make a mess!!


put some (very small amount) on the back of my hand and use a real techniques buffing brush, my foundation was finished in less that a minute! Perfect for when you in a rush for school!

Cheeks & Lips

As you can see from Sarah and Taissa's make up the lips and cheeks are quite understated. Sarah has gone for a nude lip and Taissa has gone for more of a colour stained lip. I think when you want a bit of colour, a stained lip is great, it's so easy and quick and best of all you can use one product to stain the lips and put colour in your cheeks!

I would recommend one of these....
They're around £8 for with the Revlon Just Bitten or the Bourjois Colour Boost.


I put the colour on the back of my hand and lightly dab all over my lips until I get the stained colour I want. Then the same for the cheeks, dab the colour on the apples of your cheeks - make sure you go lightly and build the colour up otherwise you'll have two bright pink spots on your cheeks! 

And there you have it fresh faced, quick make up for young beautiful skin!!

Have you tried any of these products?

Hannah x

Beauty Tip of the Day - Award Season - Mila's Simple Smokey Eye


Last post of the week on the amazing looks from this years Golden Globes, I couldn't leave out the beautiful Mila Kunis! 

The reason I wanted to highlight her make up was to show that a smokey eye can come in all different styles. This is a style of smokey eye that is so simple to do but it's still really effective! 


For this look the main color has been focused on the lash lines. 

I would say if your going to invest in any brushes for make up, I would always recommend a blending brush for eye make up. They do all the work for you, especially when it comes to blending out a smokey eye. 

However, if you don't want to buy a make up brush but you want to achieve this look I would recommend buying an eyeliner with a smudger on the other end. 


This is a No.7 one for about £7.00 but you can get one by most make up brands. I would say unless your used to wearing black liner go for a dark brown, it can be easier to wear.

All you need to do is line as close to the lash line as possible, on your top and bottom lashes, and then use the smudger on the other side to smudge the line out for a smokey look. 

In this look Mila does have some shadow on the outer v to make some shadowing and smoke onto the lid as well. But see how you get on with this first, as it can be very effective on its own.

Have you enjoyed my beauty tips from the Golden Globes this week? If so which celebrity was your favourite?

Hannah x


Monday, 13 January 2014

Beauty Tip of the Day - Award Season - Barely there Make Up like Margot Robbie

Award season!!!! Yey!!!! This is my favourite time of year for looking at all the celebs and getting inspiration for make up and hair. I thought overall for the golden globes, the celebrities had gone really chic and classy with their make up, concentrating on flawless, glowing skin, and paying attention to the lashes.

My favourite make up was on Margot Robbie, so simple and elegant, paired with a sleek bun and fabulous dress she got a 10/10 from me. And of course that meant I had to know everything about her look.

Her make up artist Jenn Streicher who's other work includes make up for Selena Gomez, Emily Blunt and Clare Danes said that Margot wanted a 'Clean & Minimal look to compliment her Gucci gown', and that is exactly what she got, this make up is perfection!


So how do you and I get this look...?

Thankfully for us Jenn used products that we can pick up and try ourselves at affordable prices. 
She used to following -

Loreal Rivitalift Miracle Blur on the T Zone - it doesn't look like you can get this in the Uk yet unless you buy on the internet and pay high p&p charges.

Loreal's One Sweep Blush Duo in Flush - again something we need to wait for in the uk, looks gorgeous though! You can actually buy this on eBay in uk but check post and packaging.

Loreal's Voluminous Butterfly Effect Mascara - this I have recently bought!! It's amazing!!! It's sooo pigmented, my lashes look super dark. All Loreal's make up is on offer in boots for 3 for 2 so I would say get in there ASAP!!


The mascara is £10.99, it comes in Black, Extra Black, Midnight Blue and Midnight Purple. The brush is so different to anything I've ever used before, it curves to the natural shape of your lashes to make sure every single lash gets covered. 

Here's what it looks like on me...


If you look at the picture above my natural bare lashes compared to two coats of the mascara!!! Wowsers!! It's easily doubled the length of my lashes, it's amazing!!!!! I will definitely be repurchasing this mascara, I think i will also try the extra black as well, although I'm so happy with how black my lashes are here I don't know how they would be able to improve.

It doesn't say what Margot had on her lips but the nude colour suits her skin tone so well. I would recommend the nude Privee collection by Loreal that I've recommended before for the perfect nudes to match everyone's skin tones. As you know Julianne is my favourite. 


The other thing about Margot's look that makes it stand out is her glowing sun kissed skin, to start with they used St Tropez all over her body, I've got the wash off one which I love, you can buy that at boots as well for your face and body, starting from about £10, or if you want a professional to do it, you can get a full body St Tropez tan starting from around £30.

Hope this helped to get an insight into Margot's look, if you've got any questions please leave a comment and I'll do my best to help!

Who was your favourite celebrity on the catwalk of the Golden Globes?

Hannah x


Mens Beauty Tip Monday! shaving Series 6/6

This week I'll be focusing on award season for the ladies. We kicked off with the Golden Globes last night, but we can't forget how good a well groomed man looks in a tux! 

So I thought what better way to finish our Men Shaving Series by talking about Special Occasion Shaving!!

Let's look at some of the guys who do it so well.....


Now I'm not a fan of a beard, much prefer a freshly shaved face, maybe slight bit of stubble peaking through like Mr Cooper here. We've looked at what to do leading up to a shave, during and after a shave but I've been reading about the actual technique to shaving, maybe when you've got a bit more time or want to put in a bit more effort like an awards evening, but if your not going to one of them anytime soon maybe a wedding or a black tie event you may have been invited to.

One tip that I thought was interesting was to Double Shave.

Start by using whatever shaving foam or cream you use, lather over the whole area, then, taking a new blade lightly shave with the grain, don't concentrate on removing all the hair, just a top layer. Then reapply another layer of your shaving foam this time apply more pressure and shave against the grain, this will give you a closer shave and better results.

What happens when your going out and you cut yourself shaving, your about to put on a crisp white shirt so you really can't afford to be bleeding and tissue stuck to your face isn't really an option.

There's a couple of things on the market at the moment designed for that very thing, only problem is they are mostly in America, but you can buy one or two from eBay or Amazon. One of those products is - 

As you can see it has been especially designed to stop bleeding fast and soothe the skin afterwards.

If you need a solution right now here are some of the at home remedies you can try...

Lip Balm - Helps seal the wound and allows a clot to form
Anti-perspirant - Dab a bit on cut it will act as an astringent to bind cut


Let me know if any of these tips work for you.


Hannah x


Sunday, 12 January 2014

Giveaway!!

As promised on Instagram @hannahsbeautyaddiction I would do a giveaway when. Y blog reaches over 1000 views! 


I'm giving away the following- 

My ultimate favourite product of 2013 is my hot cloth cleanser from Boots, No.7, and another favourite the end of this year was Loreal glam shine balm gloss in Sin for Peach.

Just go to my Instagram page for details on how to win, ends 26th Jan! 


Hannah x

Saturday, 11 January 2014

Saturdays Face of the Day - FOTD

Today's face of the day full list of products

Face 

Soap & Glorys feel good factor moisturiser
Max factor miracle touch liquid illusion foundation in creamy ivory 40
Benefit Boi-ing concealer
Maybelline 24/7 Powder in ivory
YSL Touché Éclat in 1 rose lumiere
No. 7 mineral perfection blush in 05 rose pink

Eyes

Urban Decay primer in Eden
Urban Decay Naked 3 in Strange, Limit, Nooner & Factory
Maybelline Falsies Mascara

Lips

Soap & Glory FABU lipstick in Matte Pom Pom


What's make up product couldn't you leave the house without this morning?

Hannah x

Friday, 10 January 2014

Review Week - Lush Butterball


I thought I'd mix up my reviews a little bit by putting in a Lush butterball review, normally I would review make up, beauty or hair products but I got a few lush bits over the holidays to try. Gave a lovely gold bomb to my niece to try and my hubby tried a dragons egg bomb, which smells like lemon sherbet, mmmm gorgeous!!


I've tried quite a few of the bombs out now I would normally go for a bomb with ylang ylang because I love the smell, and I find they have always been blended with other really relaxing fragrances perfect for a long relaxing soak in the bath with your candles on!

Today, I'll be reviewing the Butterball, it's smaller than a bomb probably the size of an egg, it's £2.50 and it's a powdery white colour. I decided to try this because my skin had gone really dry recently I think because of the cold weather, and I was told by someone who worked at lush that this was really moisturising.

What lush say - 

If you have dry, sensitive or irritated skin, this is the bath bomb for you. Once the cocoa butter pieces have melted, your skin will be coated by a light buttery film that smells good enough to eat.

So just in case you have never used a bath bomb before lush print the instructions on your label -

Start by running a perfect temperature bath, get in and then launch the bath bomb into the water and watch it fizz away.

Here's some pics I took while being careful not to drop my phone into the bath :-) .....


You could really see the butter pieces inside the bomb breaking off into the bath. It didn't take long for the bomb to dissolve about a minute or two.


Your bath is then left with a buttery oily film on top which I found a bit strange, I didn't enjoy as much as I thought I would, I much prefer a bath overfilled with bubbles to sink into.


As much  as I didn't like it at the time, when I got out he bath all that lovely oil goes onto your skin, as you get dry and rub the oils in it makes you feel like you've just been for a massage at the spa and all the lovely oils are left to go into your skin.

My skin felt lovely and smooth, and the buttery pieces definitely helped with my dry skin. I didn't feel I  needed to put a moisturiser on when I got out the bath.

I would recommend this butterball if you have dry skin patches, and I would recommend the dragons egg bath bomb as well just for a lovely relaxing (emerald green) bath, especially if you've not tried lush before and your wondering what to get, I would definitely get it again!

Have you tried lush bath bombs before? What's your favourite?

Hannah x

Wednesday, 8 January 2014

Review week - Maybelline the Falsies Volume Express Mascara

Today's review is on a new mascara I've been trying for the past couple of weeks. I don't think I've used a maybelline mascara before but I've heard good reports on this one so I thought I'd give it go.

I got mine from boots for £7.99 with my advantage points - don't you just love that! Free make up!!! :-)

I like the packaging, love the colour and the lace look, but I would say the shape seems a little strange and chunky, bit strange to get used to at first.

The thing I really like about his mascara is the spoon curler brush, it's great for making sure every lash gets coated. 


This is what it looked like on me after one and two coats.


I would say you couldn't apply more than two coats without it looking clumpy, I think that's because as the formula dries it's harder to work with, it is recommended that you don't wait In between coats for it to dry.

So far so good, it's a good price, it does the job and it doesn't flake off during the day, I did find that this stays on until I remove it with eye make up remover of wipe. It does also come in a waterproof version which I might get for when I go on holiday so I'll let you know about that.

Also worth mentioning that it does say it is contact lense safe so if that is something you look for I would definitely give this a go.

What's your mascara of choice at the moment?

Hannah x

Monday, 6 January 2014

Men's Beauty Tip Monday - Shaving Series 5/6 Sssooooooothing......

Last weeks tip (Instagram only sorry! @princesshannahs) was to be careful about any irritants that you may be applying to your face, if they're stinging or sore to apply then they are not working for you!! 

So what will...

I've been doing some research online into different products, reading hundreds of reviews etc and I've picked 2 of the most highly rated, both quite pricey, but users said they lasted for months so well worth it for people struggling with sore skin.

First Up, One of my Favoruite skin care brands Clinique. I think when you buy any facial product from Clinique your on to a winner. This is their Post Shave Healer...£18.00 75ml

What Clinique Say -

* lightweight
* comforting
* provides relief for redness and razor burn

What users say -

* one bottle lasts a long time
* not too scented
* leaves skin soft
* good for sensitive skin


Second product that have amazing reviews online is an American brand called Menscience, you can't buy it direct from them as they only ship to America but you can go to mankind.co.uk and buy their products there.

This is the Menscience Post Shave Repair Spray...£24.30


What Menscience say -

* calms redness & razor burn
* combats ingrown hairs
* softens! refreshes & tones

What users say -

* helped with acne, razor burns & bumps
* helped with irritation from shaving
* easy to apply
* no residue
* very calming


Also what I thought was great about this is that it comes as a spray which is quite unusual, normally for a soothing product you think of creams or balms that you massage into the skin. This product was also recommended in GQ magazine, high praise indeed. 

Obviously everyone's skin is different, I haven't tried these products so can't recommend which one would be the better option, however, I have researched this subject quite in depth, looking at what the industry says about both the company and the product, and what actual users have said about them, I've just put it all together so it's all in one place for you.

I really think spending money on facial products that you use daily is well worth it, especially if it's helping to lessen irritation and pain, and not make your dread  when it's time to shave again!

Also worth a mention mankind.co.uk is a great website for you guys to check out!!

Hope you found this helpful, please let me know if you have tried these products or if you are now planning to, would love to know what you think about them.

Hannah x

Sunday, 5 January 2014

Review Week - Mark Hill Professional Hair Dryer

So I finally decided to upgrade my hair dryer, my last one, the Babyliss Elegance was the best hair dryer I've had, my husband got it for me a couple of years ago, but the attachment snapped, and I could only have it on the coolest setting so it didn't burn out every 2mins. So it was time for an upgrade! 


I just got this Mark Hill professional hair dryer for 1/2 price on the boots sale. I'm so happy with it so far and I haven't even started using it properly yet! It came in 2 different colour options, or should I say animal print options, you could have leopard print or zebra print. I preferred the zebra print.

First thing I noticed was how powerful it is! Wowsers!! It has 3 speed settings and 3 heat settings, as my hair is so fine though, I have it on the medium heat and medium speed, still dries my hair is rapid time!


It also comes with three separate drying attachments,

1. Concentrator Nozzle - more precise styling
2. Volume Nozzle - to straighten, add volume, lift and movement
3. Airflow Concenrstion Nozzle - fast drying, no frizz

So far I've only used the 2nd attachment and I love it, still trying to get the hang of it though. What's great about this for me as well is that even with the attachment it still fits in my hair dryer holder on my desk, I used to hate having to take the attachment off when it was hot so it would fit back in the holder once I'd finished using it.


Another thing I like about this is the metallic grill on the back, I find that on most hair dryers I've had they have been plastic, and they break very easily, but this one seems very sturdy!

One of my Favoruite features of this hair dryer though is the looooonnngg cable. That really annoyed me about my Babyliss dryer, the cable was so short I used to have to sit to one side of my desk, with this one I can boogie around my room while drying my hair! Perfect!! :-)


I've still got a lot to learn with this but I'm really happy with it so far, and I would highly recommend if your in need of a new hair dryer. I would say especially if you've got thick hair, you'll be done in minutes!! 

What are you using to dry your hair at the moment? 

Hannah x

Review Week - Soap & Glorys Crazy Sexy Khol


Another sale purchase for me was this Soap & Glory Crazy Sexy Kohl. I have been looking for a couple of colour liners so when I saw the aqua, blue and purple in this I really wanted to give them a whirl. I wasn't really interested in the shadows that came with it and they're not amazing but I will try them because I've never used any of their shadows before.

So here's what you get...

5 x waterproof liners

* super black
* cocoa bean
* aquabat
* blue my mind
* grapevine

3 x lid stuff eyeshadows

* aubersheen
* smokin
* dandy plum


Here's the swatches of the liners....
How gorgeous is that aquabat!!! Wowsers!! Really cream as well, very similar consistency to urban decays 24/7 liner. 


Here's the swatches for the shadows...
As I said nothing too special about them, the black isn't very pigmented, so can't see me using that one. But I will try the others out on the lid and let you know what they're like for staying and not creasing etc.


Can't wait to try some looks with those liners though! 

Do you like a colourful liner?

Hannah x