Showing posts with label Beauty. Show all posts

Thursday, 27 February 2014

So far, so good!

So the past week or so has been a bit crazy, hence the lack of blog posts I apologize!! 

I was hoping to do a week of hair related posts this week but that's not gone to plan! I had a set of hair extentions put in last Thursday, I LOVED them!! I've mentioned before about my hair falling out, but I've also got quite a sensitive scalp. So after five days of having them in, I had a reaction to them causing red, sore, itchy bumps all at the back of my head. Thankfully my hairdresser is a friend of mine so she agreed to get straight to the salon to remove them before any real damage was done. I thought it was interesting that she mentioned that when your hormones are off balance, like when it's the time of month, you scalp is more sensitive, makes total sense for me.

I'm going to try them again soon so when I do I'll do my hairs posts then. It will include pics of the extentions, products I used, daily and weekly routines in caring for the hair, and a couple of hair styles. So hopefully that will be coming soon :-/ 

On a positive note, I have managed to not buy any beauty products! Although it's killing me, and my Wishlist is growing bigger and bigger, eek! I will not go into boots!!!

On a different note, I've started a 5 day juice detox. I've done it before and it was great, I lost 7lb and I felt great, my skin felt so good after, and I had so much energy, so I'm hoping for the same again this time. If you feel the need to clear your skin, and give yourself a general boost I would highly recommend it. 


Have you ever tried a detox? What do you think of them? 

Hannah x


Wednesday, 19 February 2014

Beauty Tip of the Day - Green Eyes!

So today lets look at Green Eyes. Colours to compliment green eyes are purples, plums, burgundy's and coppers. A make up artist will instantly say that purple will make the green pop the most but a deep plum colour can look sultry and effective too.

Here's how celebrities have done it...


Scarlett Johansson


Kristen Stewart - I love Kristen's eye make up here but the hair and face look greasy/oily so let's try to just focus on the gorgeous eye make up!!

Which look do you prefer?

Hannah x

Beauty Tip of the Day - Brown Eyes!

Today we are looking at Brown Eyes. You can't really go wrong with brown eyes because they are neutral you can try any colours. There are colours I prefer with brown eyes though. If you want to have more of a toned down day look bronze and peaches will work well, if you want a sultry night time look navy looks great, or if you want a pop of colour try greens or purples.

Here's some celebrities trying some different looks...

Selena Gomez

Emma Watson

Nicole Scherzinger

Kim Kardashian

Also worth a mention is Rita Ora, I've never really paid much attention to her make up before, I've always just seen red lips and bleach blonde hair but I saw a look of hers that I loved and decided to have a look for a couple more. I also thought she look a bit like Beyoncé which I've not noticed before.


What's your favourite look from these?

Hannah x


Tuesday, 18 February 2014

Beauty Tip of the Day - Make Your Eyes POP!!

This week I want to discuss the right eye make up for your colour eyes, what will bring out the colour in your eyes the most. When it comes to choosing the colour for your eye shadow you want to choose a complimentary opposite on the colour wheel.


I'm not going to confuse you with the different terms etc, because when it comes to the colour wheel and choosing make up it can get quite technical, so ive done it all for you, including showing you some celebrities that do it well.

So today is Blue Eyes!

Opposite to blue on the colour wheel are browns, bronze, gold - all those kinds of colours are going to make blue eyes really stand out.

Some celebrities that do it well....

Julianne Hough

Taylor Swift

 
Hope this helps you ladies out there with blue eyes!
 
Do you look at celebrities for make up ideas to match your eyes?
 
Hannah x


Wednesday, 12 February 2014

Beauty Tip of the Day - Use What You've Got Challenge

Ok so this post isn't really a beauty tip, it's more of a challenge or goal I'm setting myself this month! My name is Hannah and I am addicted to Beauty Buys!!! I have decided after discovering some makeup products that I haven't used for a while they I don't finish anything!!!!

Exhibit A - All these foundations were all in my everyday make up bag today!!!! All 6 of them!!! All with at least half left in them, but what was I doing last night while looking through New York fashion week beauty for inspiration - looking at new foundations! I have a problem!


So I'm setting myself a challenge! No beauty buys for a month!!

I know we're half way through the month so some of you may say it's not a full challenge but starting today 12th of February and finishing 12th March (gasp!) I am not going to purchase a Lipstick, a foundation, a mascara, a moisturiser, or a balm of any description!!! Nothing!! Nada!! Niente!!!

This may be hard as I am also dieting so normally when Im craving chocolate I tend to find myself in the middle of boots with lipgloss in hand!

But no! I will not give in!! There are plenty of things I want/need, so this week on my blog I will be reminding myself of that to give me focus! 

Who's with me!?!?!?!

Hannah x

Thursday, 6 February 2014

Get your Glow Back - Fake it!

Sometimes no matter what we do we just can't get our skin to look glowing and refreshed so sometimes we have to fake it! 

I use highlighter/illuminater almost every day to do just that!

Here's a couple of my favourites... 

One is a pink toned liquid illuminater the other is a golden toned powder. I like a liquid either under, mixed with or over my foundation, it's a really versatile product that you can use in different ways to achieve what you want for that day. I love the gold toned powder, even though it can only be used over foundation, it gives a warm healthy glow and I use that on the tops of my cheek bones nearly every day.


Both of the ones used here we're limited editions that you can't get anymore but they're are plenty on the market to choose from depending on your price range and look you like to achieve. 

The easiest to work with if your new to highlighter I think is a powder, I would say go to your nearest drugstore and play around with them on the back of your hand. If you like a more bronzed look or have a darker skin tones give the golden toned highlighters a go, or if you have fairer skin, or like pinky blush go for a pink toned highlighter. 

I was looking at the soap and glory stand (again) the other day and they have highlighters in both pink or gold tones that we're gorgeous! 

Let me know your favourite highlighter to use when you need to fake it!

Hannah x

Wednesday, 5 February 2014

Beauty Tip of the Day - Get Your Glow Back - Put A Mask On!!

No I'm not telling you you should just wear an actual mask to cover your face up, I'm talking about a mask that you put on and wash off!

I like to use masks on my face and hair. I use a face mask once a week, you can make your own from different ingredients you have around the house but today I'm going to show you one that I'm loving at the moment. 

I've been trying out No.7 Energising Mask. I've used this mask twice now, and both times I was really impressed with results. It slightly tingles on the skin when you first apply it, and when you peel it off (which is a form of satisfaction in itself if you can peel it off in one go!) your left with really soft, radiant skin. Also your skin isn't left dry, you don't feel the need to apply moisturiser after, which I love.


Here's how to use it, and what it's like...


The hair mask/conditioning treatment I have been using is TRESemme Platinum Stength Deep Conditiong Treatment. I've been using this for at least 6 months now and I absolutely LOVE it!!!!! I have REALLY thin hair, that has been really temperamental for the past 2 years or so. It has been falling out by the handfuls, and as a women, our hair means a lot to us, so it's been quite upsetting. I researched several products but one day saw this on offer and decided to give it a go. 


The first time I used it I noticed my hair looked heathly and shiny, it was soft and well conditioned even after blow drying and styling. At that point I thought to myself even if that's all it does it definitely worth using. But, a couple of weeks went by and I noticed my hair had significantly stopped falling out, if not completely stopped coming out!! I thought at first that it could be a coincidence until I ran out a couple of months ago and my local drugstores and supermarkets didn't have any in. It had literally been a week and my hair was coming out all over again!! Thankfully I found some  and within a couple of days it was working again. I use a small amount everyday but I would also recommend just using it once a week to bring that natural shine and bounce back to your hair!

Trust me I wouldn't live without this product!! It's my desert island must have!! 

So now I've stopped losing hair I'm trying to find products to stimulate growth, any tips or products you guys know of please let me know! And if there's any face masks your enjoying let me know which ones.

Hannah x

Tuesday, 4 February 2014

Beauty Tip of the Day - Get Your Glow Back!! Exfoliators

I'm back!!!! Wow, it feels like I haven't blogged in a while. I've been away, got some much needed rest and relaxation and now I'm back to the daily grind!

Which means my daily tips and blogs are back!! Yey!!! I've been hauling and testing products while I've been away so I've got lots to tell you about.

This week I wanted to talk about getting your glow back. 
For me there's a lot contributing to why I have lost my glow over the past 6 months -

* Poor Diet
* No Exercise - Both contributing to a 2 stone weight gain and awful skin!!!
* Weather - leaving my skin dry and dull
* Alcohol - with the December holidays, nights out and a holiday I have drank more than usual, this has contributed to me being bloated, putting weight on, and dehydrating my skin
* General everyday life

So I need a drastic change, not just to make me glow on the outside but the inside as well. What do I mean by glow? Well literally, glowing, healthy skin. I'm sure you've noticed with your own skin when your on a good diet you skin looks so good, it's healthy, nourished, make up glides on and looks perfect, but you can also glow from the inside out. For me, glowing from the inside when I'm on a good diet means I feel healthy, I'm not tired, and I'm much happier but it's the opposite when I'm feeling like I am now. 

So where do we begin, all the above has to change but as I'm changing my diet and exercise etc I've also changed my skincare routine which I'm going to talk you through over the next few days.

So the beauty tip today is to exfoliate your skin once a week.

For my face I'm using No. 7 Beautiful Skin £8.50
I have only used this once so far and I instantly loved the results, I applied it to damp skin and removed with a muslin cloth. It left my face smooth, and it didn't feel dry which is a problem I have found with some facial exfoliators. Another bonus I had the boots £5 off no.7 skincare so it was only £3.50!! Bargin!! 

For my body I'm using Soap & Glorys Pulp Friction £8.00
I have used this for about a year if not longer, it's my favourite scrub, it smells gorgeous and leaves my skin so smooth. Another great thing about this product is that it goes into a lather so you only need a small amount, so one bottle lasts for ages, great value for money. If you like to fake tan, this is a great exfoliator to prep the skin.


Hope your now one step closer to getting you glow back!

Let me know what exfoliators are you favourite at the moment! Or maybe what your doing if you've lost your glow.

Hannah x

Friday, 24 January 2014

Beauty Tip of the Day - Manicure Week - The 5 min manicure!

We're all in a rush most of the time, whether its work or family commitments we rarely have time to sit and pamper ourselves. A couple of years ago, painting my nails would be a daily occurrence, I would sit for ages at the weekends painting intricate designs on each nail, adding glitter and stones, a real work of art. I would paint them but not really give myself a proper manicure or allowing them anytime to breath or heal in between. Doing that, mixed with general life left my nails breaking, peeling, and my cuticles were a mess, just generally looking horrible.

I went for an emergency appointment to my friends salon and had a manicure with an OPI gel top coat. They looked so much better and now the length is getting just where I want it to be.

If you don't have the time or the money however I've done a quick DIY manicure that should take no longer than 5 minutes!!

What you'll need....

1. A nail file, I like a glass file rather than an emery board as I think its less harsh, but use what you've got.

2 . A cuticle pusher, you can use an orange wood stick if you prefer but I think this is quicker.
 
3. A good base coat - for what ever you need, a strengthener, a ridge filler, a growth stimulator.
 
4. Cuticle Oil - can be found at a boots or superdrug - don't miss this step!!


If you've got slightly more time and you want to add colour you will need...
 
5. A colour polish
 
6. A top coat - I like a chip resistant
 
7. Quick drying spray - again available at superdrug or boots.


Ready....Go!
 
1. File all nails, making sure you only sweep the file in one direction to get the desired shape
 
2. Use cuticle pusher to push back all cuticles removing any excess from the nail bed, leaving nail bed clean
 
3. Apply a very thin layer of base coat, this will dry very quickly if you have applied a thin layer.
 
4. Apply a drop of cuticle oil to the cuticle of each nail and rub into whole nail, this will leave your nails looking nourished and perfect!
 
If you have a little more time....
 
After step 3 applying your basecoat...
 
4. Apply two coats (if needed) of your chosen polish
 
5. Apply a thin layer of top coat
 
6. Spray all nails with quick drying spray
 
7. Finally apply a drop of cuticle oil!
 
And your done!!
 
If you keep practicing this technique your nails will look healthy and perfectly polished in no time at all!!
 
Hope you find this helpful, if you have any favourite products of any of the above let me know.
 
Hannah x

Tuesday, 21 January 2014

Beauty Tip of the Day - Manicure Week - How to remove Glitter Varnish

This week on my blog is Manicure Week! I've had a few questions on how to's for nails so this week is dedicated to that!!

Thought I'd start with a subject close to my heart - Glitter Nail Varnish!!!! I LOVE glitter polishes, my favourite brand for their glitter range and great prices is Barry M. Here are some of my favourites...


Gorgeous!!!!!! Doesn't glitter just make everything better!!! I think a glitter nail can compliment most outfits and look great on a night out! 

Only problem is....taking it off!! Before I discovered this method, I would dread the moment where I had to remove the glitter. I don't know about you but I would sit there with my cotton wool and a whole bottle of remover to be sat there 30 minutes later, used cotton balls all over the floor, no remover left, varnish stained fingers, and not much paint on the nail but the glitter would still be holding on!!

No more my friends!! No more!!

All you need is -

1 x bottle of any nail varnish remover
10 x small strips of kitchen foil
5 x cotton wool pads cut in half to give you 10 halves


Step one - soak the cotton wool half in remover and place over your nail.


Step two - wrap that with a piece of kitchen foil.


Step 3 - After 5 mins or so, squeeze the foil and pull off your finger! You will find all the varnish has been removed and your ready to apply a base coat for your next colour.....probably another glitter now you know how easy it is to remove!! ;-)

Hope this helped my fellow glitter fans!!

Also worth a mention is Barry M's newest collections!!

A new matte finish foundation in 5 shades for only £5.99
And three new eye and cheek palettes £6.49 each
I'm really looking forward to trying these, they've been out for a few weeks but I haven't seen them in stores near me yet. Time to shop!!

If you've tried any of the new products please let me know what you think!

Hannah x


.

Sunday, 19 January 2014

Men's Tip Monday - Manicure Week

This week on my blog is all about taking care of your nails, so time to put the MAN in manicure! I'm not saying you need to go as far as a polish, that's a bit excessive but a manicure, even a 5 minute DIY job is better than nothing.

Why? Because nice, clean, short, tidy nails say a lot about a man and his hygiene standards. A man with long dirty nails is not a man that you want holding your hand or cooking you dinner, trust me guys, if I'm thinking it, other girls are thinking it too.

I only have two rules for you really,

1. Keep em' clean
2. Keep em' short

So what if you don't want to go to a salon because your too embarrassed? I've got a few essentials that every man should have to be able to do a quick DIY manicure at home.

A nail brush - great for cleaning your nails, especially if you have a job where your hands are always filthy! Available in most supermarkets or drugstores like boots.


Second thing - Nail Clippers . Unless you have used scissors for years on your nails and your happy with them, get clippers, great for keeping them short, styled and it's super quick and easy to use. Again you can pick these up at supermarkets or drugstores.


Last but not essential (this maybe a step too far for some so just keep scrolling if it is!) 
A Nail File. If you have used the clippers and cut your nails short, you may find you hacked away without much regard to the shape your leaving behind leaving them uneven and catching on your clothes. Keeping a nail file handy when you've trimmed you nails just finishes them off. Lightly file in one direction two or three times to leave the free edge of the nail smooth.


And in no time at all you will be done!! See, it wasn't that painful was it!!

Hannah x


Thursday, 16 January 2014

Beauty Tip of the Day - Award Season - Don't be afraid of a pop of Colour!

I loved Kaley Cuoco's make up for the Golden Globes!! It's so different and refreshing to see a smokey eye with a pop of colour rather than the normal smokey blacks, grey, browns, nudes etc. Kaley's make up artist decided to go for a Emerald Green smokey eye to bring out the colour in her amazing gown.


I was really surprised to hear she used Avons Glimmerstick £6.00 Emerald (picture below in blue) to add the pop of colour to the eye, along with other products, but it shows how affordable celebrity looks can be. 

What's good about this product is that is so versatile, you could use it for the whole eye, or if you not feeling to confident with a full colour eye, you could use the Glimmerstick to add a colourful liner, either on the lid or under the eye.


I actually decided to go for a pop of blue last night to try out the new Soap & Glory liners I got. I was really pleased with them, really easy to apply and it lasted all night without irritating the eye!!

If you decide to go for a full smokey eye like Kaley and your not sure what colours will work use something like an eyeshadow quad like Loreal Colour Riche, it does all the colour selection for you for the perfect smokey eye. They are highly pigmented and you can buy from boots for £7.99 in a full range of colours, blues, pinks, greens. I'll be doing a beauty post soon on how to choose the best colours to bring out your eye colour.

Color Riche Quads E8 Bleu Marinière

Do you like to add some colour to your eyes?

Hannah x


Beauty Tip of the Day - Award Season - Jessica Chastain's Lovely Lashes

I LOVE Jessica Chastain's look here, her make up is so simple so natural looking, but at the same time she looked glowing, vibrant and absolutely gorgeous!!!  

Two things I loved about this make up in particular is her highlighter which looks beautiful, and her LASHES!!!! Her lashes for me make this look! I love fake eyelashes to add a touch of glamour to your make up, I used to only wear lashes for events or nights out but I've started to appreciate them a lot more for just day to day as well. 

I don't wear the same kind of lashes for day and night, I go for thickening or lengthening natural lashes for the day, but for nights out I would go for the same kind of look Jessica has gone with here.


The brand I love for all my lashes is Eylure. You can get them from boots for around £5.00 + and they all come with their own lash glue.

Here are a couple of lashes that I would recommend for a fuller lash look like Jessica's. 

These here, are strip lashes. They are more natural looking, so if you don't like anything to much, these will be perfect for adding more length to your lashes without looking to heavy. 

These next pair are for more experienced lash wearers, they might be a bit heavy if you've never tried lashes before. The reason I've chosen these two pairs of lashes are because as you've probably noticed the lashes are longer in the outer part of the eye than the inner, giving a cat eye look, I think they are the most flattering kind of lashes.


The other option you can get is individual lashes, you can do these yourself or get a salon to do it for you. Using individual lashes can allow you to taylor the lashes how you want them, thickening, lengthening them, adding more as you go.


I personally prefer strip lashes, I think they're easier to apply and easier to remove. Also if you look after your strip lashes by carefully removing them and storing them properly you can use them again and again.

I will be doing a tutorial soon on how to apply lashes for those who need some help. 

Do you wear lashes? Leave a comment if you have a favourite brand.

Hannah x


Wednesday, 15 January 2014

Beauty Tip of the Day - Award Season - Keep Young Skin Young!


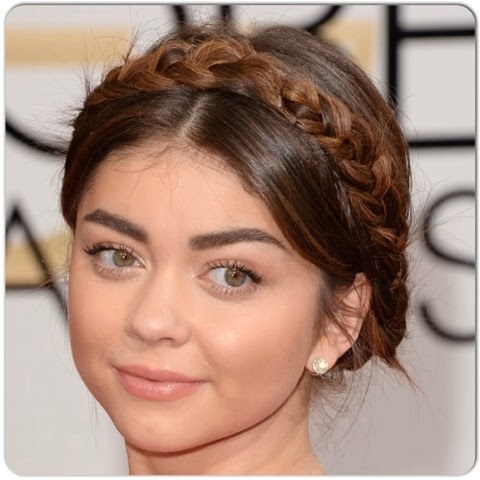
Today we're going to look at slightly younger celebrity looks. They both looked so beautiful and fresh faced, that suited their age perfectly! Rather than masking their beauty, the make up enhanced their naturally gorgeous glowing youthful skin. So I thought I would show you some ways you could do the same! I'm going to focus on foundation, cheeks and lips because I think when your in a rush for school, you want to be able to do it quick!

Sarah Hyland - 23


Taissa Farmiga - 19


Foundation

You may have gorgeous skin that doesn't need any foundation, but majority whether needed or not wear it anyway. With young skin though, you really want to stay fresh faced, a mistake a lot of girls make is thinking that caking the make up and foundation on makes them look older - which is does - but it may not be all that flattering.

I've recently tried out Loreal's Nude Magique Eau de Teint (£9.99) which I think will compliment younger skin perfectly, it's a light coverage allowing your natural glow to still come through, but it's enough to make you feel that you have foundation on. It says it's a fresh feel foundation, weightless, and it is, I can't feel that I have it on but my face is so soft and silky I love it! 


It is a very very thin consistency though!!!!! So don't make a mess!!


I put some (very small amount) on the back of my hand and use a real techniques buffing brush, my foundation was finished in less that a minute! Perfect for when you in a rush for school!

Cheeks & Lips

As you can see from Sarah and Taissa's make up the lips and cheeks are quite understated. Sarah has gone for a nude lip and Taissa has gone for more of a colour stained lip. I think when you want a bit of colour, a stained lip is great, it's so easy and quick and best of all you can use one product to stain the lips and put colour in your cheeks!

I would recommend one of these....
They're around £8 for with the Revlon Just Bitten or the Bourjois Colour Boost.


I put the colour on the back of my hand and lightly dab all over my lips until I get the stained colour I want. Then the same for the cheeks, dab the colour on the apples of your cheeks - make sure you go lightly and build the colour up otherwise you'll have two bright pink spots on your cheeks! 

And there you have it fresh faced, quick make up for young beautiful skin!!

Have you tried any of these products?

Hannah x

Beauty Tip of the Day - Award Season - Mila's Simple Smokey Eye


Last post of the week on the amazing looks from this years Golden Globes, I couldn't leave out the beautiful Mila Kunis! 

The reason I wanted to highlight her make up was to show that a smokey eye can come in all different styles. This is a style of smokey eye that is so simple to do but it's still really effective! 


For this look the main color has been focused on the lash lines. 

I would say if your going to invest in any brushes for make up, I would always recommend a blending brush for eye make up. They do all the work for you, especially when it comes to blending out a smokey eye. 

However, if you don't want to buy a make up brush but you want to achieve this look I would recommend buying an eyeliner with a smudger on the other end. 


This is a No.7 one for about £7.00 but you can get one by most make up brands. I would say unless your used to wearing black liner go for a dark brown, it can be easier to wear.

All you need to do is line as close to the lash line as possible, on your top and bottom lashes, and then use the smudger on the other side to smudge the line out for a smokey look. 

In this look Mila does have some shadow on the outer v to make some shadowing and smoke onto the lid as well. But see how you get on with this first, as it can be very effective on its own.

Have you enjoyed my beauty tips from the Golden Globes this week? If so which celebrity was your favourite?

Hannah x


Monday, 13 January 2014

Beauty Tip of the Day - Award Season - Barely there Make Up like Margot Robbie

Award season!!!! Yey!!!! This is my favourite time of year for looking at all the celebs and getting inspiration for make up and hair. I thought overall for the golden globes, the celebrities had gone really chic and classy with their make up, concentrating on flawless, glowing skin, and paying attention to the lashes.

My favourite make up was on Margot Robbie, so simple and elegant, paired with a sleek bun and fabulous dress she got a 10/10 from me. And of course that meant I had to know everything about her look.

Her make up artist Jenn Streicher who's other work includes make up for Selena Gomez, Emily Blunt and Clare Danes said that Margot wanted a 'Clean & Minimal look to compliment her Gucci gown', and that is exactly what she got, this make up is perfection!


So how do you and I get this look...?

Thankfully for us Jenn used products that we can pick up and try ourselves at affordable prices. 
She used to following -

Loreal Rivitalift Miracle Blur on the T Zone - it doesn't look like you can get this in the Uk yet unless you buy on the internet and pay high p&p charges.

Loreal's One Sweep Blush Duo in Flush - again something we need to wait for in the uk, looks gorgeous though! You can actually buy this on eBay in uk but check post and packaging.

Loreal's Voluminous Butterfly Effect Mascara - this I have recently bought!! It's amazing!!! It's sooo pigmented, my lashes look super dark. All Loreal's make up is on offer in boots for 3 for 2 so I would say get in there ASAP!!


The mascara is £10.99, it comes in Black, Extra Black, Midnight Blue and Midnight Purple. The brush is so different to anything I've ever used before, it curves to the natural shape of your lashes to make sure every single lash gets covered. 

Here's what it looks like on me...


If you look at the picture above my natural bare lashes compared to two coats of the mascara!!! Wowsers!! It's easily doubled the length of my lashes, it's amazing!!!!! I will definitely be repurchasing this mascara, I think i will also try the extra black as well, although I'm so happy with how black my lashes are here I don't know how they would be able to improve.

It doesn't say what Margot had on her lips but the nude colour suits her skin tone so well. I would recommend the nude Privee collection by Loreal that I've recommended before for the perfect nudes to match everyone's skin tones. As you know Julianne is my favourite. 


The other thing about Margot's look that makes it stand out is her glowing sun kissed skin, to start with they used St Tropez all over her body, I've got the wash off one which I love, you can buy that at boots as well for your face and body, starting from about £10, or if you want a professional to do it, you can get a full body St Tropez tan starting from around £30.

Hope this helped to get an insight into Margot's look, if you've got any questions please leave a comment and I'll do my best to help!

Who was your favourite celebrity on the catwalk of the Golden Globes?

Hannah x